Saturday, April 30, 2016

Automatic Light control using Labview and arduino

Automatic Light control using Labview and arduino

This project is about automatically turning on LED's , when the light intensity goes low. It uses a LDR, 10k , 220 ohm resistors, and arduino uno .

A very simple Easy to do automatic light controller in Labview , LDR connected to arduino and LDR reading are fed to Labview and can find the intensity of light, If the light intensity goes below the set level all the lights turned ON and Turn OFF if the intensity level is HIGH.


The above fritzing shows how the connection are established between arduino and the other components. 

Labview program for LIFA :

Labview Program for LINX

The VI's for LabVIEW can be downloaded from the above links.

Friday, April 29, 2016

Controlling relay using Arduino and Labview


The above fritzing uses a 5v relay , If you are using a 12v relay you need to connect an external supply for powering the relay.

This is the simple relay control operation, where the control can be feed to the arduino by using Labview frontpanel, This example uses 3 DC motor to represent switching ON and OFF of motor, this same program can be used to control many application for switching and a timer can be added for controlling timed control applications. The above circuit can be modified for the controlling of AC circuits too, be cautious when connecting with AC circuit, use AC circuit only when needed.
Labview VI can be downloaded from here :
https://www.dropbox.com/s/vaufwhzkb2f9co2/relay.rar?dl=0

RF control Wireless Robot Using Labview and Arduino


The above fritzing is for RF Transmitter

Required components for Transmitter:

HT12E (Encoder)
RF Transmitter (I used ASK Transceiver)
Resistor 1 Mega Ohm
Arduino :)


Required components for Receiver

HT12D (Decoder)
L293D (Motor Driver)
RF Receiver
1 Meg Ohm Resistor


 Required Components For the Robot

Chasis
Wheels
Motors
Breadboard
connecting wires
Battery

Labview Vi and Fritzing files can be downloaded from the link.
https://www.dropbox.com/s/b2h9opzo8nbc135/rfcontrol.rar?dl=0

Simple Fire Detection and alarm using labview and arduino


Required Components:
Fan
buzzer
Photo diode ( IR receiver )
LM 385 (operational Amplifier )
Resistor 2 x 10k ohms
Potentiometer  10k ohms
LED
connecting wires
Labview File and Fritzing can be downloaded from the link below :
https://www.dropbox.com/s/hh62xcdrg72u31v/fire%20alarm.rar?dl=0

How to Make a Voice Control Robot Using Arduino and Labview.

This project make use of the windows speech recognition, Given commands are converted into strings and check with the existing stored commands, If the command matches with the stored commands It executes certain function that assigned to that particular command.

This video explains How to make a voice control robot , its very simple and easy to do robot, you don't need complicated wireless circuits to make this robot works. this project make use of an RF wireless module which is available everywhere and cheap to use.

This project does not need any extra module installed to the laview, this project make use of the available windows speech recognition and easy to use.

for better results, take a speech recognition training with your system which makes it easy for the system to understand non native speakers and gives better result

For Circuit diagram and components requirements check the below link.
http://www.labviewarduino.in/2014/10/rf-control-wireless-robot-using-labview.html


Labview File for Linx can be downloaded from here:
https://www.dropbox.com/s/r3f424htukvmjoi/Voice%20Recognition%20Project%20.rar?dl=0


Labview File for Lifa can be downloaded from here:
https://www.dropbox.com/s/exbwjmeepf0roxd/voice%20recognition.rar?dl=0

DC Motor Control by LabVIEW

How to control DC motor with the help of arduino and labview, its possible to control 2 motors using L293D Motor IC, by using this motor driver we can control motor in 2 direction and speed of the motor can be controlled by connecting pwm pin of the arduino to the enable pin of the motor IC. 

PREREQUISITE :

Little Programming experience using LabVIEW

Understanding Electronics circuits 

circuit diagram for controlling DC motor
The above circuit uses the L293D IC for controlling a DC motor. It's possible to control two DC motor with the help of L293D IC

Complete file can be downloaded from here. 

Arduino Linx file can be downloaded from here

Virtual Prototyping in Solidworks and LabVIEW

How to use solidworks and LabVIEW for real time simulation,  real time machining operation can be done using these soft-wares. Unlike other simulators that is inbuilt with many CAD software , this can be used for real time testing of new machine design and the same program can be used physical machining process with the help of labview hardware resources that is available with labview. 

CAD files and labview files can be download from the below link:

LabVIEW

Solidworks

Virtual Prototyping And Real Time Testing

This project is about virtual prototyping and testing of the product using LabVIEW, SoftMotion, SolidWorks and Arduino

If you don't have time to test products in real time , Virtual prototyping is the answer for you, with the help of labview Softmotion its possible to interface solidworks and labview, by interfacing labview and solidworks , real time testing can be done in the virtual environment by applying the required parameters to the labview block diagram.

accurate motor calculation is possible with labview and solidworks.

If you are building a new product , before going for a physical prototype , interference between mechanical design can be resolved, accurate motion timing can be calculate with the help of softmotion.

If you are a product developer and use SolidWorks for your design, then you should contact LabVIEW for a checkout to look into SoftMotion.

It saves much time for machine builders, solving many problems that can occur in Inter engineering products example a mechatronics system. 


Labview files :
https://www.dropbox.com/s/wa8ramgwudiw3or/servotest.rar?dl=0

SolidWorks Assembly files:
https://www.dropbox.com/s/n0sgs7ve1rjx1jh/SG90Servo.zip?dl=0

Robot Kinematics Using Labview, Solidworks and Arduino

Virtual prototype of LR Mate 200ic

This project uses solidworks, labview, softmotion and arduino.
CAD model is created with help of SoldiWorks, Labview used for creating control singnals, Softmotion used for interfacing LabView and Solidworks, Arduino is used for position command by the user, This video is particularly analyzes the inverse kinematics for the robot. 


This video made by interfacing labview solidworks and arduino. check the blog about how to interface labview arduino and solidworks.

How to connect Labview and Soliworks

This video's about interfacing NI labview with SolidWorks.

You need NI labview, NI softmotion and solidworks with Motion analysis to successfully do this testing on your own.

More details are included in the video check it out and share your thoughts.

If you are looking for a detail video about how to interface solidworks and labview, you are on the right blog, this video has included all the details about how to interface these softwares. 

6. Android Arduino Speech recognition bot.

This app combines tutorial 2 and 4 to make a new project, as we discussed earlier that speech to text conversion app can be used for many projects, this is one of the application of that app, we using the same for the robot we created during our 4th lesson. This follows same hardware and all the codes are same make the robot and have fun. 


if you had so much during all your learning and want to explore additional things you can check the book here

please leave your suggestion and queries to this mail id periyeriveeramaniayya7@gmail.com

5. Know your Home Temperature and Humidity creating an Android app

There are many app and widget floating market for knowing outside temperature and humidity, but there are no app that can provide your Temperature and Humidity inside your home, by creating this app you can retrieve temperature and humidity data from arduino.
By following the above tutorial you can make your own app that display temperature and humidity data as well as this app will make you hear what is the current temperature and humidity at your home. for this project I used DHT11 sensor with arduino to export temperature data to my android app, similarly you can use any Temperature sensor like DHT22 or DHT23 or DHT33 or one wire ds180b20 type of sensor can be used to replicate the same project. 

4. Make a Android Arduino Robot

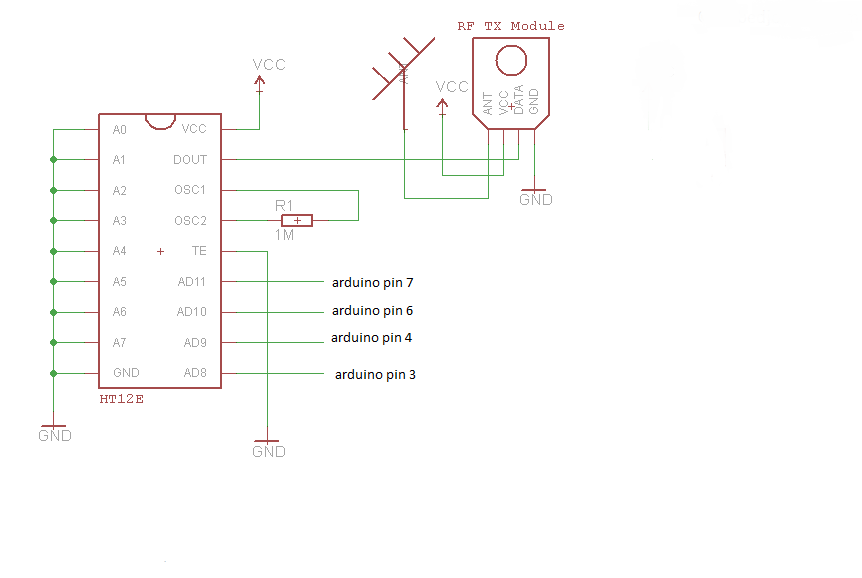
In this tutorial you will be learning on how to make an app for controlling an robot by android app, you will be using android phone as remote controller to control the robot.

You need 2 gear motor with wheels

A motor driver, you can use any of the motor driver you want, I used L293D motor driver for this project.

You also need a battery and connecting wires, apart from that as usual a Bluetooth and Arduino board is needed to complete this tutorial.


--------------------------------------------------------------------------------------------------------------------------

#include <SoftwareSerial.h>

SoftwareSerial BT(10, 11); //TX, RX respetively
String readdata;

void setup() {
 BT.begin(9600);
 Serial.begin(9600);
  pinMode(3, OUTPUT); // connect to input 1 of l293d
  pinMode(4, OUTPUT); // connect to input 4 of l293d
  pinMode(5, OUTPUT); // connect to input 3 of l293d
  pinMode(6, OUTPUT); // connect to input 2 of l293d

}
//-----------------------------------------------------------------------// 
void loop() {
  while (BT.available()){  //Check if there is an available byte to read
  delay(10); //Delay added to make thing stable
  char c = BT.read(); //Conduct a serial read
  readdata += c; //build the string- "forward", "reverse", "left" and "right"
  } 
  if (readdata.length() > 0) {
    Serial.println(readdata); // print data to serial monitor
// if data received as forward move robot forward
  if(readdata == "forward") 
  {
    digitalWrite(3, HIGH);
    digitalWrite (4, HIGH);
    digitalWrite(5,LOW);
    digitalWrite(6,LOW);
    delay(100);
  }
  // if data received as reverse move robot reverse

  else if(readdata == "reverse")
  {
    digitalWrite(3, LOW);
    digitalWrite(4, LOW);
    digitalWrite(5, HIGH);
    digitalWrite(6,HIGH);
    delay(100);
  }
// if data received as right turn robot to right direction.
  else if (readdata == "right")
  {
    digitalWrite (3,HIGH);
    digitalWrite (4,LOW);
    digitalWrite (5,LOW);
    digitalWrite (6,LOW);
    delay (100);
   
  }
// if data received as left turn robot to left direction
 else if ( readdata == "left")
 {
   digitalWrite (3, LOW);
   digitalWrite (4, HIGH);
   digitalWrite (5, LOW);
   digitalWrite (6, LOW);
   delay (100);
 }
 // if data received as stop, halt the robot

 else if (readdata == "stop")
 {
   digitalWrite (3, LOW);
   digitalWrite (4, LOW);
   digitalWrite (5, LOW);
   digitalWrite (6, LOW);
   delay (100);
 }


readdata="";}} //Reset the variable


--------------------------------------------------------------------------------------------------------------------------